Tutorial: Variations and Padloper (Part 2)
API: Talking to Padloper
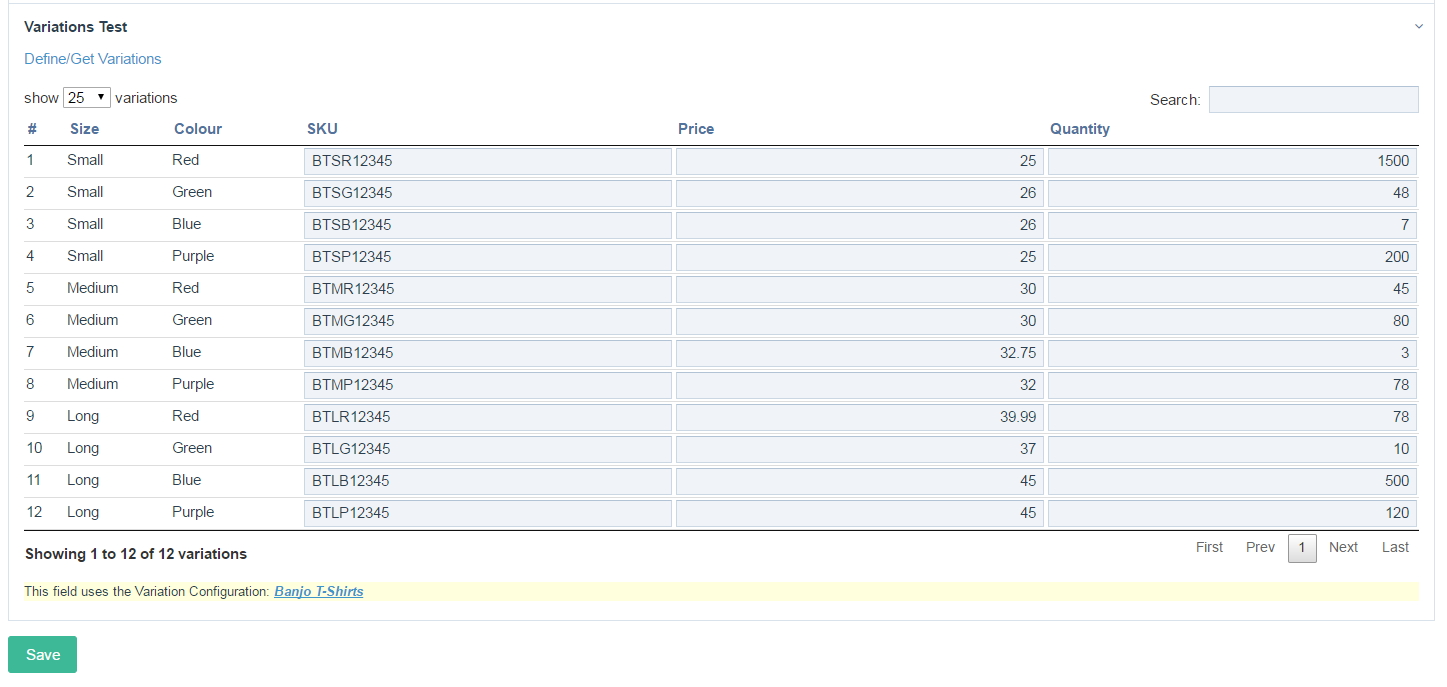
Now that we have setup and entered values for custom attributes for our product variations, we are ready to sell those products! In Part 1 of this tutorial, we saw the populated Variations field on our products' page looks like this:

As you can see, our Banjo T-Shirts product has 12 variations each of which has its own Price, SKU, etc. For the purposes of this tutorial, we are chiefly interested in the different prices of our product variations.
Our goal is to present the product with its different variations. When a customer selects a variation of the T-Shirt they want, we need to apply the correct price. If there is no variation price, we need to apply a default price. We assume you have already set up Padloper for this product page. It means Padloper already knows about this product page's default price field.
We will use JavaScript (jQuery) and PHP to accomplish our goal. We will use the jQuery to add items to our basket. We will use PHP in an auto-load module specifically for Padloper and also in the template file of our product page. Let's get started.
Product Template File
The code below is the content of the template file that our product page's template uses. For this example, the template file is called variations-field-padloper-tests.php.
There is nothing complicated about the code. Our main focus is the HTML form that wraps around the form elements that represent our product's variations. The Variations field on the product page is called variations. The code checks if that field is not empty. If it is not, it outputs the form markup.
As you can see from the code, we have two options for listing the product variations, either in a select dropdown or as radio inputs. The code and the screenshots further down this page show that the former was used in this tutorial.
If we have variations on the page, we grab them and loop through them. As previously stated, a Variations field returns a VariationsArray (a WireArray). Each object in this array is an object of type Variations as mentioned in the documentation. If a variation has a price, we use that, else we use the default price in the page's price field. In this case, the field is called price. As we loop through the array, we use the object's properties to output unique titles to identify the variations in the select dropdown. Each variation can be identified by its Size and Colour as well as Price. More importantly, we pass the respective form elements (e.g. option if using select dropdown) a HTML data-attribute with a value equal to the variation's ID. These data-attributes in the form are named data-attr-variation-id. We will be targetting them in our JavaScript as will be seen later.
After the selects, we have a hidden HTML input with the name variation_id. This is very important. When the form is submitted, Padloper will look for that input when processing product variations. We will also be targetting that input using JavaScript, dynamically changing its value depending on the selected product variation before submitting the form via Ajax. More of this below.
We round off the form with a submit button.
<?php

/**
 * FieldtypeVariations + Padloper Integration
 * Used: main.css; main.js, PadloperCustomHooks.module; this file (variations-field-padloper-tests.php)
 *
 */


// product image
$productImage = $page->image->first() ? '<img src="' . $page->image->first()->url . '" alt="' . $page->title . '">' : 'Image Pending';
$out = '
		<div class="block prod_img">
			<h1>' . $page->title . '</h1>'
			. $productImage . '
		</div>';

// product variations
$out .= '<div id="prod_price_p" class="block">';

if($page->variations && $page->variations->count > 1) {

		// product's form
		$out .= '<form method="post" class="padloper-cart-add-product" action="' . $config->urls->root . 'padloper/add/">';

		##########

		// if using selects for product variations
		$out .= '<select name="product_id" class="product_id">' .
				'<option value="0">' . __("Select a T-Shirt") . '</option>';

		// grab the product variations
		$variations = $page->variations;

		foreach ($variations as $v) {
			// if we have no variations price, we fall back to default price (in page's price field)
			$price = $v->price ? $v->price : $page->price;
			$variationAttrs = '#' . $v->id . ' ' . $v->size . ' ' . $v->colour . '<em> (£' . $price . ')</em>';

			##########

			// if using radios
			#$out .= "<label><input type='radio' class='product_id' name='product_id' value='{$page->id}' data-attr-variation-id='{$v->id}'> {$variationAttrs} </label><br>";

			##########

			// if using selects
  			$out .= '<option value="' . $page->id . '" data-attr-variation-id="' . $v->id .'">' . $variationAttrs . '</option>';

		}
		// if using selects
		$out .= "</select>";

		##########

			// hidden input to dynamically hold variation ID depending on selected variation's value
			// manipulated via JS + custom Hook
		$out .= '<input type="hidden" id="variation_id" value="" name="variation_id">' .
			// submit form button
			'<input type="submit" name="pad_submit" value="' . __("Add to cart") . '">' .
			// close the product's form
			'</form>';
}

else {
  		$out .= $modules->get("PadRender")->addToCart();
}

$out .= '</div>';// end div#prod_price_p
Auto-load Module
The code below, adapted from the Padloper documentation, contains a number of ProcessWirer Hooks to manipulate our product. Please go through the code. It contains comments to let you know what's going on. We throw the code into an auto-load module to simplify our work. The most important thing here is what is going on in the code. If you go with an auto-load module, you will need to, obviously, install the module first.
Methods
The code contains a number of methods. The method init() should be familiar if you have looked at ProcessWire module code. We use it to initialise our Hooks. We use two Hooks. They both hook into PadCart.module. The first will change the product title and the second will manipulate the product price.
The method customProductTitle() will get the product page and the variation_id that is sent via POST (see JavaScript code below). Note that the method gets the variation ID from the Padloper method that we hooked into, i.e., getProductTitle(). It then checks if the page is a product page we are interested in. If it is, using the helper method getVariation() to get the product variation that was added to the basket. We use the variation ID for this purpose. If we find a variation, we manipulate the product variation title, else we return.
The method customProductPrice() is very similar to the customProductTitle() method. It Hooks into the method getProductPrice(). After preliminary checks, it gets and stores the default product price from the event object (product page). Using the helper method getVariation(), it fetches the product variation. If it finds one and that variation has a price, it sets that as the product price. Otherwise, it sets the default price as the product's price.
The helper method getVariation() uses an in-memory selector to fetch a product variation (a Variations Object) and returns it.
<?php
/**
* All the hooks for use in PadLoper
* @see https://www.padloper.pw/documentation/product-variations/
*
*
*/
class PadLoperCustomHooks extends WireData implements Module {

  public static function getModuleInfo() {
    return array(
      'title' => 'Custom hooks for padloper',
      'version' => 1,
      'summary' => 'Customs hooks for various bits pieces in padloper (titles, prices, etc).',
      'singular' => true,
      'autoload' => true,
      );
  }

  public function init() {

    /*
     * Here we define all our hooks. If you look at PadCart.module, you will see that those
     * two methods we are hooking are all very simple and made only for hooking.
     */
    $this->addHookAfter('PadCart::getProductTitle', $this, 'customProductTitle');
    $this->addHookAfter('PadCart::getProductPrice', $this, 'customProductPrice');
  }

  /**
   * Custom title for product variations.
   *
   * @param Object $event The Hook Event.
   *
   */
  public function customProductTitle(HookEvent $event) {

    // This way we can access the arguments that are sent to hooked method
    $product = $event->arguments('product');
    $varID = (int) $event->arguments('variation_id');

    // only target pages using our product template [change to suit your needs]
    if ($product->template->name != "variations-field-padloper-tests") return;

    // get the current variation
    $v = $this->getVariation($varID, $product);

    // For some reason variation product is not found, so let's fail silently
    if (!$v) return;

    // The modified return value is set here
    $combinationsStr = ' (' . $v->combinations . ')';
    $event->return = $product->title . $combinationsStr;

  }

  /**
   * Custom price for product variations.
   *
   * @param Object $event The Hook Event.
   *
   */
  public function customProductPrice(HookEvent $event) {

    $product = $event->arguments('product');
    $varID = (int) $event->arguments('variation_id');

    // only target pages using our product template
    if (!in_array($product->template->name, array('variations-field-padloper-tests'))) return;

    // default price field to modify
    $defaultPricefield = $event->object->pricefield;
    // get the current variation
    $v = $this->getVariation($varID, $product);
    // set the price: if we found a variations price, we use it, else fall back to default
    if($v && $v->price) $event->return = $v->price;
    else $event->return = $product->$defaultPricefield;

  }

  /**
   * Helper method to get a product variation.
   *
   * @param Int $varID A variation ID.
   * @param Object $product The Page Object representing our product.
   * @return Object $v A Variations Object.
   *
   */
  public function getVariation($varID, $product) {
    $var = $product->variations;// our variations field is called 'variations'
    // get the current variation in order to access its price
    $v = $var->get("id=$varID");// @note: in-memory search
    return $v;
  }
jQuery Code
The code below (part of which is adapted from the Padloper documentation) is all we need to add a product variation to the basket. It is pretty straightforward.
The function addVariationToCart() uses Ajax to post the form rendered in our template file and update our basket. When a product variation is selected in the product's select dropdown (or radios, if using that markup) we change the value of the hidden input for product variations' IDs (see our template file above) in our form to match the ID of the selected variation. The ID is held in the HTML element's data-attr-variation-id. If using the select dropdown markup, we get this from the selected option. If using radios, we get it from the selected radio input.
When we click the Add to Cart button, if the hidden input of variations' IDs is not empty, the form is submitted by calling the function addVariationToCart(). Otherwise, we do nothing. If the form was successfully submitted, the function addVariationToCart() updates the basket.
/*************************************************************/
// FUNCTIONS
/**
 * Using Ajax, add a product variation to a cart.
 *
 * @param Object form Form to process.
 *
 */
addVariationToCart = function(form) {
		var url = form.attr('action');
		// Send the data using post
		var posting = $.post(url, form.serialize());
		posting.done(function(data) {
			if (data.errors) {
				var str = '';
				$.each(data.errors, function(i, val) {
					str = str + val;
				});
				alert(str);
			} else {
				$('#totalQty').html(data.totalQty);
				$('#numberOfTitles').html(data.numberOfTitles);
				$('#totalAmount').html(data.totalAmount);
				// if using radios, uncheck last checked radio on add to basket
				//$('input.product_id').attr('checked', false);
				// if using selects, reset to first option
				$('select.product_id').val('0').prop('selected', true);
				// reset the hidden input for variations' IDs
				$('input#variation_id').val("");
			}
		});
	}
/*************************************************************/
// READY
$(document).ready(function() {
	// on change radio/select, get the variations ID as specified in the data-attr
	$(document).on('change', '.product_id', function() {
		// if using radios, get the data-attribute of the radio itself
		//var variationID = $(this).attr('data-attr-variation-id');
		// if using select, get the data-attribute of the selected option
		var variationID = $('option:selected', this).attr('data-attr-variation-id');
		// set the value of the hidden input to be the variationID
		$('input#variation_id').val(variationID);
	});
	$(".padloper-cart-add-product").submit(function(e) {
		e.preventDefault();
		// if no variation ID, do nothing
		if (!$('input#variation_id').val()) return false;
		addVariationToCart($(this));
	});
});
Here is a screenshot showing successful submission of the form with product variations and the server response (Padloper's response).

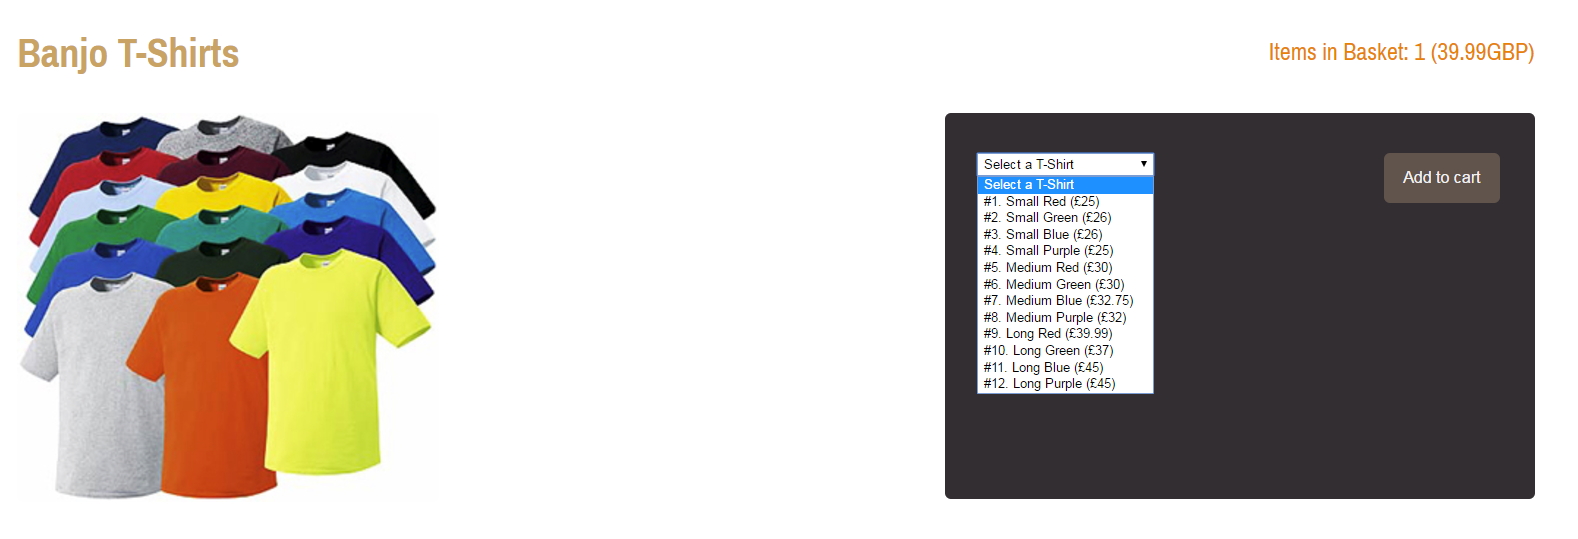
The image below shows an example Padloper shop, with our T-Shirts variations.

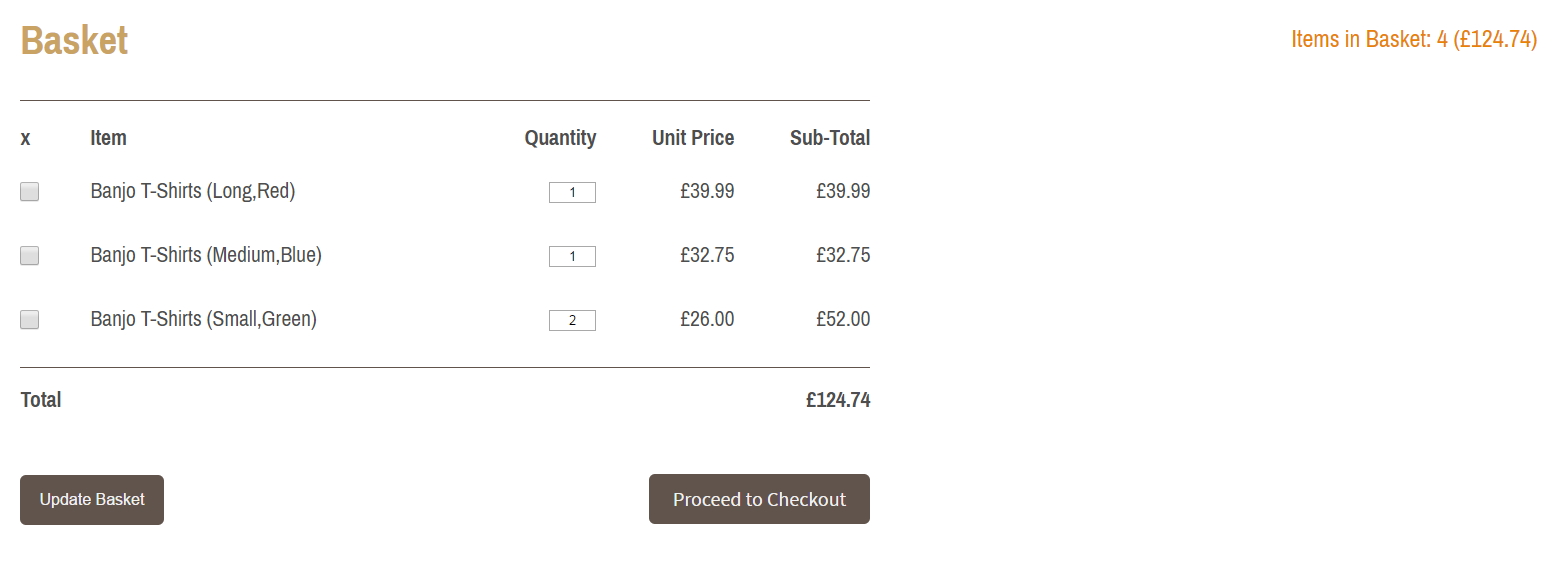
This screenshot shows the basket with a number of T-Shirts added. If you compare the prices to the values entered in the Variations Inputfield in the Banjo T-Shirts product page, you see that the prices are correct. Note the variations in parentheses next to the product name. Note also the quantities of product variations are correctly added up.

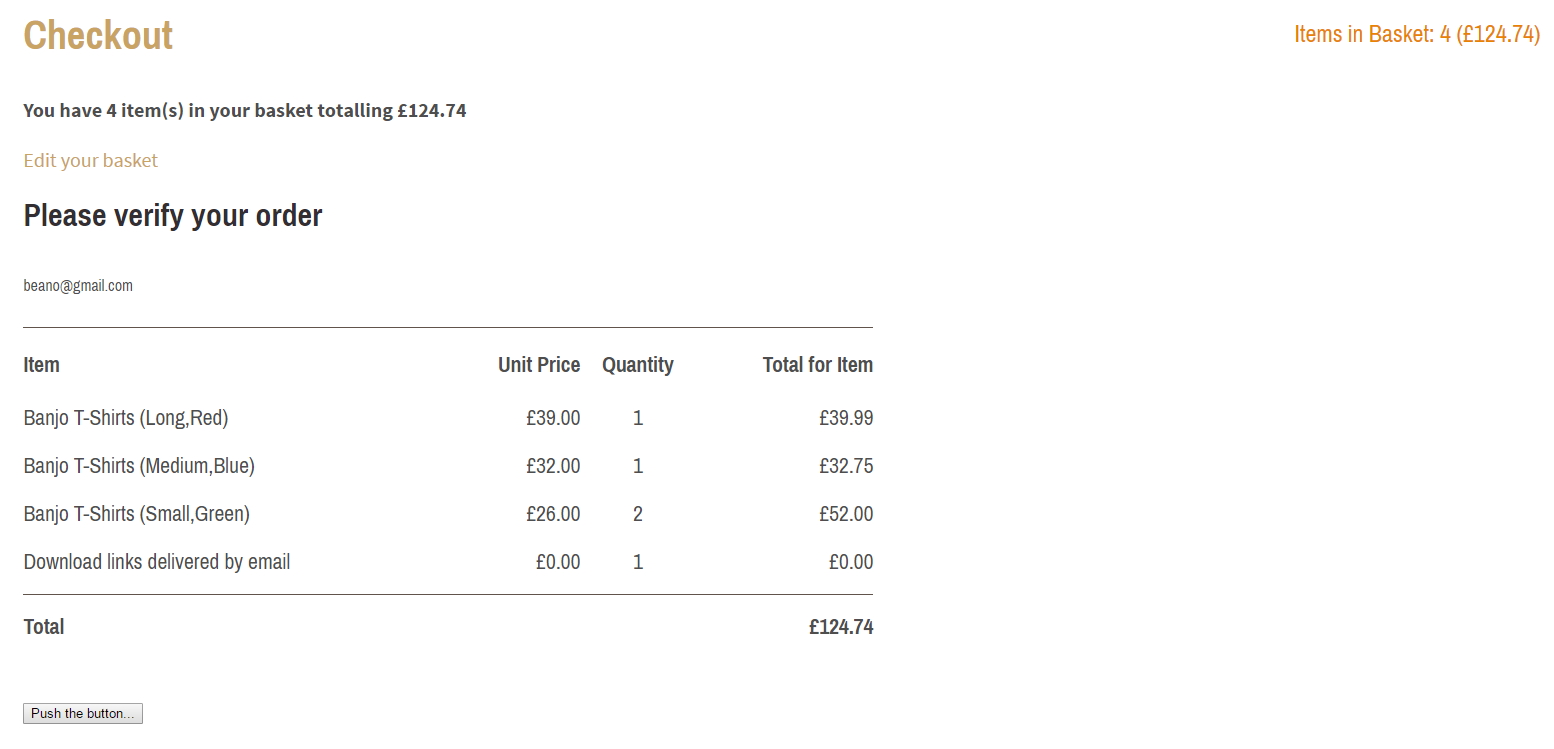
Here is a screenshot of the checkout. As you can see, all our product variations were successfully added with the correct price for each.

To test if your default price works, delete the prices of some of the variations. Those product variations will be have the default price listed as their price. If you add them to the basket, the default price will be picked up as their price.
That's it! We have successfully created product variations and had them play nicely with Padloper.
Summary
In this short tutorial, we have seen how easy it is to integrate FieldtypeVariations with Padloper. Using some simple JavaScript and PHP, we have been able to easily add product variations to the shopping basket ready for checkout. We only covered the basics in the tutorial. With a little bit more imagination and good coding skills, you can get as fancy as you like. Happy coding!
